Hatouf's Silk Painting Technique 1st part
1. Create the Design
First Hatouf must decide on the size of the finished image and sketch out the design to fit these perimeters. The size is limited by the raw silk width, 90-100 cm. Sometimes people send her a piece of fabric on which to create a commissioned painting, requiring that she work within it's perimeters.
If she is recreating an existing design (as with the Turkish miniatures), she enlarges it to her size requirements and plans out her color scheme. When Hatouf creates a design for text from the Holy Qura'n pieces, she contemplates a surah and tries to visualize what people will think and how much they will understand the meaning of what they read.
Hatouf's Silk Painting Technique 2nd part
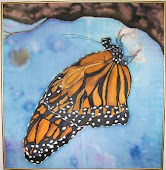
2. Mask Drawing
Next, Hatouf will spread her design out on a table and cover her pencil marks with scotch tape, to prevent rubbing off or smearing.
3. Transfer to silk
Now Hatouf stretches her silk piece tightly over her design and traces the lines onto the silk with pencil.
4. Stretch the silk
The silk must now be placed on a frame and stretched as tight as a drum.
5. Outline in Gutta
Gutta is a glue-like substance which is used to mask the fabric to keep certain areas from soaking up the paint. Hatouf traces over her pencil lines with gutta, to a mask the thin lines she drew. She fills in the gutta using a plastic applicator with a very fine metal tip. The original gutta is colorless but she mixes pigment with it to create any color she needs. She must be very careful to ensure that each area of color is completely enclosed by the gutta, or the soluble colors will leak out into surrounding areas.
Hatouf's Silk Painting Technique 3rd part
6. Adding Color
Now soluble colors are carefully painted into the areas outlined with gutta. Hatouf uses soluble colors from Dupont which she dilutes with alcohol or water. Once touched to the fabric, the paints are not removable, so great care must be taken not to spill or apply the wrong color to an area. Since many of her designs are dependent on a repeated pattern, any mistake here would be immediately obvious in the finished piece.
7. Drying the Painting
Hatouf lets her finished painting dry for one day before attempting to remove the gutta.
8. Steaming the Painting
Hatouf uses a machine which takes about three hours to remove the gutta using steam. She wraps her painting in old newspaper and adds just enough water to keep the painting from getting wet.
9. Finished Painting
After the steaming is complete, she just removes and unwraps her piece, and Hatouf has a finished silk painting, ready to frame!
by http://www.youngartists.com/thatouf.htm
Silk Painting - Techniques

The Serti (closing or fence) technique is the silk painting technique where designs are formed with gutta or water-based resists, which are applied to white silk that has been pre-washed, dried and stretched (on a stretcher). Once the gutta or water-based resist has dried, it acts as a barrier for the dye or paint—keeping the color within the outlined areas of the design and allowing you to achieve sharply defined borders. (Without this barrier, the dye or paint would flow into more of an abstract, undefined pattern.) After the dye or paint has been properly set, the clear gutta or resist is removed and a defining line the color of the original fabric remains. Colored guttas and resists are also available that are meant to remain in the fabric.
Detailed patterns without resists can be achieved by instead priming the prewashed and stretched silk with a stop-flow primer which is left to dry before painting on the dyes or paints. The color will stay where you put it, rather than migrating. Allows for freehand painting without gutta or water-soluble resists. Think of stop-flow primers as starch-like sizing to prepare the canvas with. They wash out in the end.
Watercolor-like effects can be achieved by applying dye or paint to silk that has been pre-washed and put on stretcher bars whether or not you are using resists (but not if you are using stop-flow). Dyes or paints are applied to the silk with a paint brush, mist sprayer, eye dropper, or other tools to achieve abstract effects. Spraying the silk lightly with water before adding color increases the flow of the dye or paint. Sprinkling silk salt on the piece when still wet, and leaving till completely dry before brushing off the salt, produces interesting textural effects. Applying alcohol to dye-painted silk also creates beautiful effects.
WHAT YOU NEED:
- Silk Paints or Dyes
- Paint Brushes
- Gutta or Water-Soluble Resist
- Applicator Bottle for the resist
- Some kind of Stretcher Frame
- A white silk item to paint on
HOW IT'S DONE:
Step 1: Prewashing your silk
Step 2: Preparing your design
Step 3: Making a Stretcher Frame
Step 4: Stretching your silk
Step 5: Applying gutta or resist
Step 6: Applying dyes or paints
Step 7: Setting/Fixing the color
Step 8: Removing clear gutta or clear water-based resist
Step 1: Prewashing your silk
Pre-wash your silk by hand or in the washing machine on a gentle cycle with warm water and Synthrapol. Rinse, dry and when still slightly damp, press with an iron, set to the silk setting.
Step 2: Preparing your design
With a pencil or vanishing marker, lightly draw your design onto the silk. The Serti Technique lends itself well to designs with enclosed areas where the color will be contained within the resist lines.
Step 3: Making a Stretching Frame
You will need a frame to stretch your silk and suspend it off the table. There are a variety of types of frames you can use, depending on the size of the piece you are painting and the materials that are available to you. Artist's canvas stretcher bars work very well. They are sold at most art supply stores in different lengths, in pairs. Old wooden picture frames also work well or you could build your own frame with wood. The wood that you use needs to be soft enough to allow push pins or 3-pronged tacks to be pushed into it. In a pinch, you could also cut out a frame from a cardboard box.
If you are painting a piece that has already-finished edges (such as a scarf), you will need to make sure that the inside measurements of the frame, are at least 2-3 inches larger (on each side) than the silk piece you will be painting so that the edges of the silk will not make contact with the stretcher bars (which would leave unwanted paint marks on the silk). You can create a 'trampoline' effect with rubber bands and safety pins or silk clips (see below).
Step 4: Stretching your silk
Stretch your silk onto your frame with stainless steel push pins or silk thumb tacks every 4-6 inches along each side. Another method is to use rubber bands and safety pins, silk clips, or Chinese Suspension Hooks: attach small safety pins, clips, or hooks connected to rubber bands to the edges of the silk, every 4–6 inches; the rubber band then goes around a push pin which pins into your frame). If need be, you can link rubber bands together for extended lengths. The advantage of the rubber bands method mentioned above is that the elasticity of the rubber bands will maintain the tension of the silk for you.
The goal when stretching your silk is to create just the right amount of tension so that the silk remains taut while you are painting but not so tight that it tears. Your piece may have a tendency to sag a bit once it becomes wet with dye or paint; you may need to adjust the pinning as you are painting.
Your frame also needs to be suspended a few inches above your table so that the silk does not have anything touching it; you can do this by placing upside down plastic cups or wood blocks underneath each corner of your frame.
Step 5: Applying your gutta or resist
(see discussion of Guttas vs. Water-soluble Resists to decide which to use)
Using even pressure and a steady hand while holding the applicator bottle vertically with the tip touching the silk, draw on your resist lines. Be sure that there are no breaks or gaps in the line (or dye or paint will escape!). Check the back side of your piece to make sure the resist has penetrated all the way through. If it hasn't, you will need to apply resist to the back side as well. (This is sometimes necessary when working on silks heavier than 12 mm. Let the resist dry (you can speed up the drying time with a blow dryer, or heat gun) before painting.
Step 6: Applying your dyes or paints
(see discussion of dyes vs. paints to decide which to use)
Dip your brush into the color and apply the dye or paint sparingly to the center of an outlined area by touching the brush to the silk. Let the paint move to the resist line – do not apply the paint too close to the resist (if water-based resist becomes too saturated the line may begin to dissolve!) If there is a gap in your resist line that you didn't notice and the dye or paint starts escaping, you can stop the movement by drying it quickly with a hair dryer and then patch up the line with gutta or resist and let dry before resuming. When painting large areas (e.g., background), work quickly, applying wet to wet to avoid unwanted lines.
Step 7: Setting the color
When you have finished applying the dye or paint to the silk yardage or scarf, it's not permanent until you "set" or "fix" the color so that in the future you can wash or dry clean the piece without all the color washing out.
The method of "setting" or "fixing" the color depends on the chemistry of the dye or paint you are using. Before purchasing any dye or paint, you should read the directions thoroughly to determine if the required procedure fits your project and situation.
Setting paints with heat (Dye-na-Flow, Seta-Silk, Silkcolor by Sennelier, Arty's Heat-Set)
Allow to dry 24 hours before heat-setting the paints with an iron, 2-3 minutes on each area of your piece, face down on your ironing board with a press cloth between the silk and your iron. You may also want a protective cloth on the ironing board as well. Work in small areas at a time, moving in a small circular motion so as not to burn the silk, but also so that each section maintains the heat for a long enough duration to actually set the paint.
Setting dyes with steam (Sennelier Tinfix Design, Pebeo Silk (Pebeo Soie), Jacquard Silk Colors (green label), Dupont French Dyes, Procion Liquid H)
Of the two methods for setting silk dyes, the steaming method produces the most brilliant colors. Some people don't want to go this route, but those who do are usually very happy with the results. Read detailed steaming instructions.
Setting dyes with chemical fixative (Tinfix fixative for Tinfix Design, Jacquard Dyeset for Jacquard Silk Colors)
If you don't want to go the steaming route, Tinfix and Jacquard have liquid fixatives for their respective dyes. They can be painted on top of the dyes, or the project can be submerged. The colors will not be as brilliant and they may not be as colorfast as they would if set by steaming. Follow the manufacturer's directions for using the chemical fixatives.
Step 8: Removing clear gutta or clear water-based resist
Once the dye or paint has been properly fixed, it's time to remove the gutta or resist. Clear gutta is removed by dry cleaning. Clear water-based resist is removed by rinsing in warm water. It comes out easily when used with iron-set paints, but some brands can be very difficult, if not impossible, to remove after steam-setting dyes. Once the resist is removed, hang dry, then iron lightly while still slightly damp. See our gutta vs. resist page for more details.
If colored guttas have been used, do not dry clean (the color will come out with the gutta)! They are meant to leave on the silk. There will be some "hand" or "feel" on the silk. Some people prefer to use the colored guttas on wall hanging pieces only, rather than on wearable art.
If colored water-based resists have been used, follow the manufacturer's instructions for heat-setting with an iron before painting on the color. See our gutta vs. resist page for details. The colored resists are meant to stay on the fabric. There wil be a "feel" on the fabric.
Subscribe to:
Posts (Atom)